Keith Taylor
My Main Portfolio
… is here.
-
Recent Posts
Archives by Month
- Bad Authentication data.
Popular Posts
- Camera Shy
This past December I was sitting down at my Grandmother’s house on Christmas morning... - JJ Grey & MOFRO, The Variety Playhouse, and my iPhone
This past Saturday I was at the sold out JJ Grey and MOFRO show at the Variety playhouse... - Gay-fil-A
“My stance is simple. Love. That’s all I’m trying to promote.”...
- Camera Shy
Still Life Photography, Painting With Light, and Happy Accidents
 Posted on August 13, 2014
 by admin
  0
0 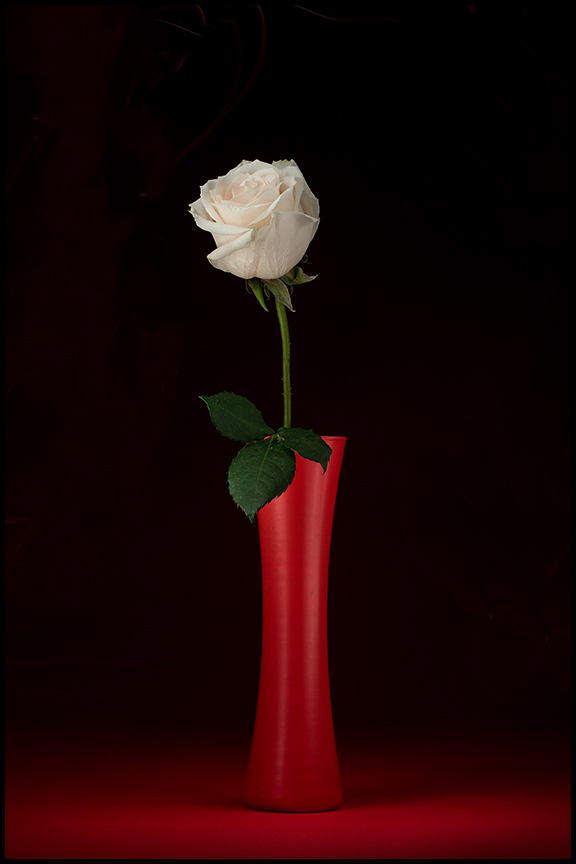
I’m sharing this to hopefully inspire some of you that have expressed interest in learning from me in the past. It is so easy to get caught up in the thought process that you need certain gear made specifically for photography (much of which is expensive) to create work worthy of admiration. That couldn’t be further from the truth. Yes, certain gear is a must to achieve a certain style or look. Sometimes. But, you can do some beautiful work from a lighting standpoint using things that are likely right around your house as long as the desire and vision for it is inside of you.
When I was creating the shot shown in my previous post, Encompassed With Love, I decided to do some light painting on the rose to see what kind of variations I could get in regards to the look / quality of light on the actual rose and nothing else. I was thinking that I might combine several files together in Photoshop to get the one finished file. Turns out that I liked the one single file I shot after I got my main lighting set up for it – which was a five foot Octobox a few feet over and just to the front of the vase, with two medium strip lights on each side of the vase a few feet behind it. I put up a couple of scrims just in front of my camera lens to prevent lens flare, and there was my shot the way I saw it in my head when I set out to do it.
I wanted to push the lighting a little more to see what else I could get. So, I turned off the strobes, as well as all the ambient light in the room, and used nothing but a mini Maglight (the old kind with an incandescent bulb, not an LED bulb) with a Kleenex over the front of it for diffusion. The shot I started off this post with is a result of that effort. It’s a 30 second exposure where I randomly shined the flashlight at various parts of the rose and vase, never leaving it in one spot for too long. I loved the look I was getting by doing this. Usually, when you think of painting with light in photography, it is involves photos that may be very cool, but it is very obvious that light painting was the technique used.
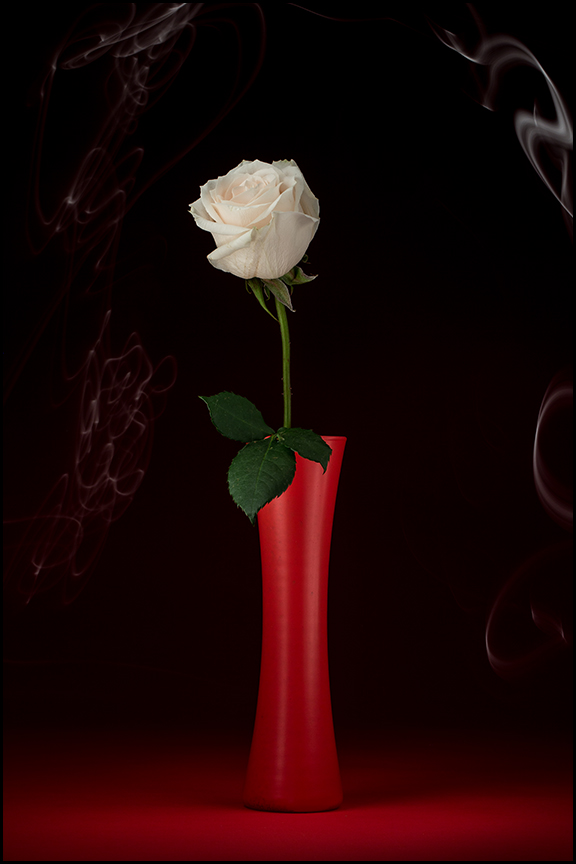
Here you can see the streaks of light in the frame from where I was moving the light around painting with it. This shot is what it looked like straight out of camera. In the final shot I just removed the light streaks and did some minor cleanup in Photoshop.
What I was seeing on my screen didn’t appear that way so much, though. Aside from seeing the streaks of light on the outside of the frame (where I was moving the light around during the exposure) it looked like it was lit with some fancy lighting setup. Nope. That’s nothing but a Maglight and my desire / vision to create something cool with it.
It was so nice getting in the studio and shooting still life when I usually am working with people on location. When photographing people, there is always a tension that goes with it. They may only give you that great, or totally at ease, expression for a second, and you have got to catch it. Plus some people just have a very limited tolerance for having their photo made, so you may only get to snap off a couple of frames before they’re done with it (Yes, on a job once, a CEO / company owner actually only let me get two frames of him and he was done with it. Luckily, I got a very rare shot of him actually smiling in a photo in one of those two frames…).
Where as, with still life, it is so much more relaxed. You can put on some of your favorite music and just get into a zone while shooting. Your subject isn’t going anywhere, so you can experiment with it. I always recommend having a clear vision of what you are looking to create before you even start setting up your shot, but once you have achieved that goal, you can take it to another level and possibly create something just as beautiful as your original vision – or maybe even something that you like even more. In the advertising / creative world this is called a “happy accident” – and happy accidents can sometimes yield the best shot from a shoot.
So, go have a happy accident with your camera on purpose. It’s not as dirty as it sounds.
**********************************************
Here are a few other examples of things you can use that are cheap everyday household items that you can get great results with in regards to lighting, as well as a more detailed explanation of how to something to the shot I have posted here – or how I did it:
1.) Sure, you can buy a collapsible reflector to bounce light back into your subjects face, or, you can get a few pieces of poster board sized foam core from your local craft store. Buy four that are white, and two that are matte black. Take two of the white ones and leave them white. Take the other two and cover one with tinfoil, or silver wrapping paper, and the other with gold wrapping paper. Use the the white one to give soft, more natural looking fill light, the silver one when there is less intense light to reflect back into your subject, or when you want a more contrasty look to the light, and use the gold when you want to warm up the skin tones on your subject. Use the black pieces to either retract light from one side or the other of your subject, or use it as a flag to keep light light from getting into your lens, causing flare in your shot when you don’t want it there. Or use it when you’re not wanting light to fall on areas in your frame where you want less light. You can also take a black pieces of foam core and cut funky random shapes in it to allow light to pass through to give a more modeled look to the lighting. In the photo industry this is called a cucoloris or “cookie.” Just so you know, white and black foam core is used in commercial photography in these same ways all the time by photographers that have enough money to buy any light modifier or gadget they want or need. It just so happens that simple old foam core can work perfectly for it. And V-Flats made out of two 4′ x 8′ pieces of foam core taped together length wise with white gaffers tape is one of the best light modifiers you can use when it comes to giving very natural looking light to a room, or subject. Again, these are used all the time in the business in studio, or when you have a vehicle that is capable of transporting them.
2.) How about a cheap plain white low thread count queen size sheet, or shower curtain. You can use this as a “silk” to diffuse sunlight when you hang it between your subject and the sun (weight it down with some A-Clamps at the bottom to keep it from blowing in the wind), or you can shoot through it with something like a Home Depot work light or clamp light. Set your color balance on your camera to the temperature that the bulbs emit and you can do some beautiful stuff this way. Just keep any hot light / work light / clamp light a few feet from the fabric unless you are planning on using the fire that can result from not doing so as a light source.
3.) Black felt from a fabric store. Use it to either retract light from one side of your subject of or the other. Hang it in front of windows to kill much of the light passing through them in order to get your room completely dark to do a light painting or burn in shot like I’m like I’m sharing in this post. Or hang it between you and the subject and cut a small hole just big enough to fit your lens through when shooting something highly reflective. This will prevent a reflection of you and your camera from being in the shot, as well as everything else in the room behind you provided it is big enough.
3.) Pick up a branch with some leaves on it and either have somebody hold it in between your light source or and subject or rig it to stay in one place in the same way. The branch then becomes a cookie, which I mentioned already above. The light passing through it will create different shadows on your subject with varying amounts of shadow highlight transition depending on how far your light source is from it and the subject, and its size in relation to it.
4.) Or, find something that is interesting or has special meaning to you, set it on a solid surface that compliments it, and then frame up your composition with your camera on a tripod. Once you have it, lock it down, set its aperture to something like f11 ir f16 and its ISO to 100 or 50. This combination allows for you to hold the shutter open longer, giving you more time to move the light from your flashlight around on the subject. Use one that puts out a decent amount of light, but that isn’t too bright. If you’re using an old style one with incadescent light bulbs, then set your camera white balance to tungsten, or the icon that looks like a little light bulb. If you are using a LED flashlight you will need to set a custom white balance for it. Turn out all the lights and make sure the room you’re in is pretty much completely dark, and then have fun with it. The shot in this post was a 3o second exposure shot at f16 with the ISO set to 100. It’s not a hard shot to do at all, you just have got to experiment and play with it until you get the exposure and overall look you are going for. I also went to the extent of having paint matched to the seamless roll of paper I was shooting on to spray paint the vase with.
I can go on and on thinking up stuff but I’ve got other work to do…
Try some of what I’ve mentioned here, and if you end up creating something you really like from doing so, please send it to me. I’d love to see it.
You must be logged in to post a comment.